Site, equipment and materials
Choosing the right site, equipment and materials are vital for the health of your seedlings.
Choose your site
Easy visibility
Seedlings need daily maintenance. Grow them where you can observe them whilst you go about your daily activities.
Good airflow
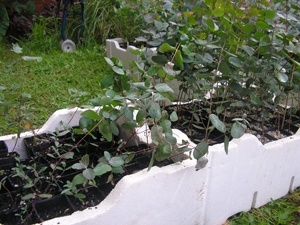
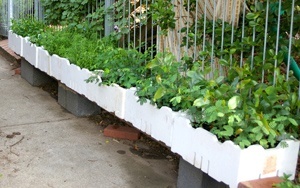
You only need a few square metres of ground for your propagation site, but it is extremely important that the site has good airflow. A north facing brick wall also holds warmth in cold winter months.
The right amount of sun and shade
Seedlings need the right balance of sun and water to ensure balanced growth. In the early stages of seedling germination, the soil needs to remain damp. Shade cloth or a position where the tubes will receive only morning sun or semi-shaded position will help prevent the soil from drying out.
Once the seedlings are 2 – 3 cm high they will require full sun to produce strong sturdy stems.
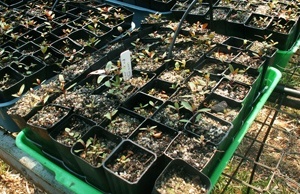
Seedlings in this image were sown at the same time. The seedlings on the left were grown in a shady position and did not receive enough sun. They are spindly and weak with many still underdeveloped. The root system will also be weak. Compare them with the seedlings on the right. The sunny position has helped them develop into strong and robust seedlings.
It is just as important to know when seedlings are getting too big. If your seedlings are getting too large and the planting season is months away you will need to slow the seedlings down by putting them in semi-shade and back off on the amount of water they get.
Protection from the weather
Listen to weather forecasts so you can take the right action to protect your seedlings.
In hail or heavy rain, you will need to have a sheltered option for your seedlings.
Wind or extremely hot weather can dry seedlings out and cause irreparable damage. Make sure plants are protected while still allowing airflow. Persistent wind will cause high evaporation. The soil will dry out and tiny seedlings, particularly if just emerging, will be damaged. Shelter from the prevailing wind will help prevent this.
Prevent water runoff
If your plants are against a wall or near trees, gutters or awnings be aware that drips can wash seeds out of their tubes or bruise and dislodge tender young seedlings.
Seedlings need natural conditions
Do not use glasshouses, poly-tubes or any type of enclosed shade house: they are far too hot and humid during the summer growing season for our indigenous species and may encourage fungal infections and produce weak seedlings.
Equipment
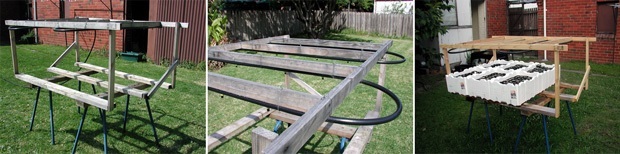
Benches
Benches keep your seedling boxes off the ground and help and protect against any interference from animals such as dogs, cats, or small children, and prevent contamination by crawling insects, weeds and other garden materials. Keep your seedlings at a comfortable and safe working height.
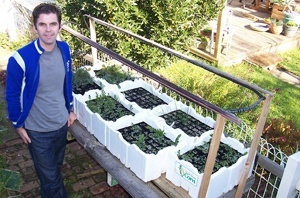
Your bench can be made from anything it simply needs to keep your seedlings off the ground. But remember no low lifting! The best bench is at waist height for easy handling.
Tips for bench building
Your bench should be:
- sturdy enough to support approximately 80 kilograms (the weight of a kit)
- well-constructed from strong materials so it will not collapse on pets or people
- comfortable working height (consider the height of your kitchen benches)
- airy, sunny position with protection from extreme winds and weathers
- close to a tap or suitable water source
- easily visible and accessible for regular inspections and maintenance
- a weed free site
- able to have protection from frost or extreme heat and if necessary possums/birds (a covered frame placed over the boxes works well)
- portable so the delicate seedlings can then be moved to an undercover area during hot or extreme weather.
Considerations for rats or possums
Possums are common rural and urban pests. In urban areas keep an eye on the telephone wires, these are the possum highway around your house.
Rat infestations occur in some rural areas. The bench will need to have vertical supports that are not easily climbed and the top needs to extend well past the vertical supports so that the critters cannot reach the edge and get on top. A 44-gallon drum with a large square flat top works well.
If you have possums or rats in your area, ensure benches are well away from overhanging ledges or branches or close platforms that the rats and possums can jump from.
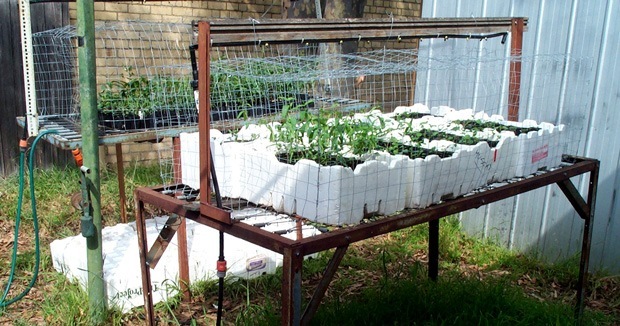
One example would be to make your bench using bricks with boards placed across. Two builder trestles and some boards give a good working height. An overhead frame supports a spray system and can be covered during frost, extreme heat or protection from possums/birds.
Ways of watering
Hand water with a hose
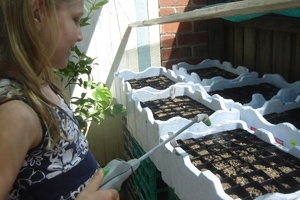
You will need an adjustable nozzle for the hose to hand water. In the beginning, through germination to when the seedlings are 2-3cm tall, you will need to set the nozzle on mist setting and water twice a day. This gentle watering is necessary to ensure that the seed and potting soil is not washed away.
Once the seedlings are 3cm tall set the nozzle on shower and water once a day except when extreme temperatures demand extra watering.
Before seedlings germinate and when they are very small water from above (not at an angle) for as long as it takes to thoroughly soak the soil. This will be when water begins to drain out of the bottom of the tubes.
Make sure that if your hose has not been sitting in the sun, flush any hot water out first. The hot water in the hose can get to temperatures of 60 degrees C (120 F) or more, which can kill your small seedlings in one hit. Empty the hot water into a container for use elsewhere.
An attachment is available that goes on the top of a drink bottle. It is possible to use clean recycled water from the house. Water that is collected in a bucket while waiting for hot water, water vegetables have been washed in etc. Be sure not to use water that would have any cleaner or detergent residue in the water. Do not use water used to rinse the dishes.
Capillary watering
Water is absorbed from the bottom of the tube. Put your tubes in a cat tray or line your Styrofoam box with plastic. Put water in the tray or box so that now the tube soaks the water from the bottom keeping the soil wet. Make several holes in the box or cat tray approximately 3 centimetres from the bottom of the cat tray to let excess water out of the container.
As soon as the seedlings are 2 centimetres high, remove from the capillary watering and water as usual to ensure that the root system strengthens.
Sprinkler system
Fine micro-jet sprays are suitable for most poly pipe spray systems. Supplies are relatively cheap and can be bought from gardening shops.
- The spray heads need to cover all of the boxes evenly. This can be a process of trial and error, both in placement of the spray heads and the height above the seedlings. Make sure the misters cover the boxes without any dry spots around the edges. Determine how long you need to run the watering system to thoroughly water the seedlings – that is, until the water runs out the bottom of the tubes.
- The poly pipe must be securely anchored or it can twist and move. The sprays may not point at the seedlings and patches of seedlings will turn brown. When a spray head becomes blocked it can be devastating so always include a suitable in-line filter.
- Check the operation of all the spray heads from time to time, especially at the start of the growing season, and prior to any extended absence. Taller growing seedlings can prevent the water reaching smaller plants in the next tube so systems require adjustment during the growing season. Ensure you change the setting on the automatic watering timer as the season changes leading into autumn and leading out of winter (if you still have your seedlings).
Automatic watering system
An automatic timer can be attached to the inlet hose on the sprinkler system and be programmed to assist the watering process. It is vital that monitoring takes place in case of equipment failure which can be the difference between a successful growing season and a failure!
Sowing materials
TreeProject volunteer growers can pick up growing supplies from the distribution point and date chosen during registration.
Indigenous potting soil
It is very important to use appropriate potting mix to grow seedlings. Potting mixes are made from a range of materials (sand, peat, composted bark etc) that have been combined to provide the best growing medium for the plants.
Indigenous seedlings are sensitive to an element in the soil called Phosphorus. Australian soils are often deficient in this mineral therefore many indigenous plants have evolved to compensate for this.
Each potting mix is rated with an NPK ratio, Nitrogen for foliage, Phosphorus for nutrient interchange and plant processes, and Potassium for flower and fruit development. The majority of Australian plants require a Phosphorus count of 5 or less.
Seedlings in soil from the garden will not thrive. Garden soil is fine in the ground but in pots it will compact and prevent the air and water reaching the plant roots so that starvation occurs.
Fertiliser
If the potting mix does not already have a slow release fertiliser in it indigenous plant fertiliser is required to boost the seedlings along. A 3 month slow release fertiliser is best.
Make sure you mix the fertiliser evenly throughout your potting mix to ensure each tube has an equal mix of the fertiliser. This helps prevent the seedlings varying in size.
After transplanting extra seedling into empty tubes, a seaweed based liquid fertiliser for indigenous seedlings can be used as a root stimulator to reduce shock and ensure seedling stabilisation. It is good practice to add this root stimulate again to the seedling a month before plating out on the land.
Mulch

The seedling tubes need to have a thin layer of mulch (sand, crushed gravel or vermiculite) placed on the top of the soil that serves as a mulch to prevent the seed from washing away and keep the spoil in the tubes from drying out.
Tubes
A variety of sizes and types of seedling tubes are on the market. Most commonly used are forestry tubes. Typically, each kit that is distributed consists of 7 polystyrene boxes holding 48 forestry tubes in each box. Each kit consists of 336 forestry tubes in total. The forestry tubes used in the kit allow for 5-6 months of seedling development before being planted out.
If your tubes have had seedlings grown in them previously ensure that they are sterilised in a weak bleach solution and scrubbed out with a brush to eliminate any contamination of pathogens lingering in the tubes. This is very important for preventing fungal diseases in the seedling you are about to sow!
Tag labelling
Ensure that with each box of seedlings is a label with the species name, the sowing date. Do not rely on your memory to know when the tubes have been seeded and which species is in each box. Each species of seed has its own timeline for germination. Documenting the date that the seed is sown is crucial in order to track the seeds germination timeline.
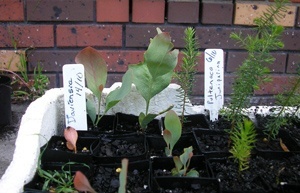
TreeProject growers need to include 4 bits of information on the labelling tag:
- Front of tag: species name and date sown
- Back of tag: Your name and who you are growing for (the landholders name)
The first two bits of information you will need to track your seedlings progress and report to your coordinator. The last two bits of information are crucial when the seedlings are delivered to the pickup point to differentiate your seedlings from the others that arrive.